
So you want to get into the exciting new world of NFTs (non-fungible tokens). Perhaps you are a digital artist, a musician, a writer or a video game designer and want to tokenize your work and sell your own NFTs. Or maybe you are interested in the investment opportunities that NFTs bring to the table. NFTs have truly taken the world by storm and are definitely here to stay!
Even traditional auction houses, such as Christie’s, have gotten on board with NFTs. And NFT celebrities, such as Beeple, have made millions practically overnight by selling their own digital art, gifs, collectibles, digital trading cards or virtual real estate. Other famous personalities, such as Jack Dorsey himself, the co-founder of Twitter, have also joined the NFT craze and are selling one-of-a-kind digital items, such as famous tweets, via this trending new blockchain technology.
Whatever the case may be, this article will show you exactly how to get set up and buy your first NFT step by step.
Step 1: Create A Web3 Wallet Using MetaMask
First you will have to create an Ethereum wallet that you can use on the most popular NFT sites. This may sound like a daunting task, but it is easier than you think. I always recommend MetaMask for this purpose since it is the most user-friendly and has the most support documentation.
MetaMask is a Web 3.0 (also known as “Web3”) wallet, which means that you can use it to:
- spend tokens on decentralized apps (also known as “dApps”)
- store your NFTs
- seamlessly navigate the decentralized finance system
- swap tokens on decentralized exchanges (DEXs)
Since we want to buy and store NFTs, the first two features are of particular interest to us.
Download MetaMask
To create a MetaMask wallet, first head over to metamask.io and choose your preferred browser (Chrome, Firefox, Brave or Edge). If you want to install the mobile app version, choose your preferred operating system (iOS or Android).

Install MetaMask
Click on the extension and then click “Get Started”.

Now click on “Create a Wallet“.

Next, MetaMask will generate a new seed phrase for your new wallet. The seed phrase is a long series of words that you will need to recover your wallet in the future.

Make sure you do not lose your seed phrase as it is the only way you will be able to recover your wallet. You can either take a screenshot or photo of the passphrase, or you can write it down and then store it in a secure location, such as a safe that only you have access to. I personally prefer to memorize my seed phrases, but this may be impractical for you, especially if you plan to have more than one wallet in the future. Remember that with crypto you have full control, but you also have to take full responsibility for your access data.
You will then be asked whether you want to help improve MetaMask. You can choose either “No Thanks” or “I agree”. Either way, all data sent to the developers of MetaMask will remain anonymous and your choice here will not affect your user experience.

Create Wallet Password
The next step is to create a secure password. This will be your normal login password in the future.

Note: The difference between the login password and the seed phrase is that the login password is simply used to log in to your wallet when you want to initiate transactions (buy or sell digital assets), whereas the seed phrase is used to recover your wallet, e.g. when you want to synchronise your existing wallet to a second device, or your existing device is broken or has been lost, and you want to access your wallet on a new device. Another occasion on which you will need to use your seed phrase is when your browser is reset, or you want to install MetaMask in a new browser.
Confirm your seed phrase
Finally, you will be asked to confirm your seed phrase.
To do this, you can simply click on the words shown in the same order that they appear in your seed phrase.

Once you have entered your seed phrase correctly, you will be greeted with a window congratulating you and giving you some final tips. It’s a good idea to read through them.

The MetaMask icon should now appear somewhere in the top right corner of your browser window.

Note: The steps for the MetaMask mobile app are very similar to the above. The only significant difference is that you will have to install the MetaMask mobile app instead of the browser extension. To get the MetaMask wallet mobile app for your iOS or Android device, head over to metamask.io and simply choose your operating system to download it like a regular app from either the App Store or the Google Play store, depending on which OS you choose. You will then be guided through the same installation steps described above.
Congratulations! You now have your very own MetaMask wallet and are ready to start transacting!


Step 2: Connect your MetaMask Wallet to OpenSea
Now you are ready to connect to an NFT platform! We highly recommend starting with OpenSea as it has a huge variety of NFTs, including very cheap ones.
- Head over to OpenSea.io.
- Once you are on the homepage, click on the “Account” icon. Then click on “My Profile” (or any of the other options in the menu).

- A sign-in page will open. Click on the Sign In button.

- MetaMask will open in the top right corner of your browser.

Make sure that your ETH is selected with a tick mark (it should be by default). Then click Next. - In the next MetaMask window that appears, click Connect.

Metamask will now connect to OpenSea, and you will be able to transact.


Step 3: Buy ETH
You’ll now need to get some Ethereum (ETH), you can skip this section if you already have Ethereum. There are a number of exchanges you can use to buy Ethereum, and we have a dedicated article comparing all the best ones out there, but the general process for obtaining ETH is as follows:
Create an Account with an Exchange
First you will need to check to find which exchanges are available in your country. But once you have found one, it’s usually quite simple to set up an account. You will need to enter your email address, set a password, and potentially provide some other information depending on the requirements of the exchange you have chosen.
Verify Your Identity
If you have chosen a centralized exchange, such as Coinbase or Kraken, you will have to go through this step by providing some form of identification, usually an ID or Passport. The documents you have provided will then undergo manual review and approval. Depending on the exchange you have chosen, this could take anywhere from 1 hour to 3 working days in my experience, however it may be quicker or take longer in your case. Once your identity has been verified, you can move on to step 3.
Link Your Payment Method and Fund Your Account
You will then have to link your credit card or debit card to your account. Most centralized exchanges don’t allow purchases via Paypal, at least not directly, but you may be able to use Paypal to buy ETH via your exchange’s P2P (Peer-to-Peer) market if it has one (not all do).
Once you have linked your payment method, you can fund your account. It’s probably a good idea to first try to fund your account with a small amount of money just to get the hang of it first, but this step should be pretty straightforward.
Buy Ethereum
Congratulations! Now you can start buying Ethereum. Different exchanges have different minimum purchase requirements. For example, on Coinbase you can make purchases as small as $2 if you are transacting in USD, but watch out for those fees regardless of where you are buying your ETH.
Other things to keep in mind when buying Ethereum
If it is your first time buying crypto on an exchange, you may want to keep an eye out for the following potential bugbears.
Fees
Different exchanges charge different fees for transactions. And these fees can also differ depending on whether you are buying or selling crypto. There could also be fees associated with depositing and withdrawing crypto from your account.
In the case of ETH, the Ethereum blockchain’s transaction fee is called “gas”. Again, depending on the exchange you have chosen to do your transactions, your gas fees may or may not be included in the transaction fees indicated when you carry out a transaction. For example, Coinbase used to include ETH gas fees in its transaction fees, but has since changed its policy, so you will have to check the fees yourself by going to Etherscan.io.![]()
Here you can see the estimated gas fees that will be required to ensure that your transfer can be completed successfully. If you choose to base your gas fees on the High column, your transaction will be completed as quickly as possible, whereas if you are willing to save on gas fees, you can choose Low or Average. It’s always a good idea to allow a little more than the estimated fees indicated, just in case.
Most exchanges do not charge inactivity fees or fees for just keeping a balance with them.
Withdrawal and purchasing limits
Some exchanges have withdrawal limits (e.g. the crypto equivalent of 1000 USD every 24 hours). This can be a hassle if the NFT you want to purchase — preferably before anyone else gets their hands on it — costs more than your exchange’s withdrawal limit.
Likewise, some exchanges also have purchasing limits on how much ETH (and other crypto) you can purchase. There are two types of limitations in this regard:
Time-restricted purchasing limits
Short-term purchasing limits are restrictions on how much crypto you can buy within a specified period of time, e.g. 24 hours. This could mean that you are limited to as little as 500 USD per day on some exchanges in my experience.
Volume-restricted purchasing limits
Volume restrictions on the amount of ETH (or other crypto) you can buy may mean that after you have bought a certain amount of crypto (e.g. the crypto equivalent of 1000 USD), you may have to either wait 24 hours before you can make another purchase, or you may have to provide more “KYC” (Know Your Customer) information before you will be allowed to buy more crypto. Paxful is an example of an exchange that requires KYC information after you have bought several thousand USD worth of crypto (the actual limit also seems to depend on what your nationality is). Once this limit has been reached, you will have to either provide more personal information (usually tax-related documentation) or no longer be allowed to buy crypto.
So it’s worth trying to find out about platform-specific withdrawal and purchasing limits before you sign up with an exchange, since it can be a hassle if you only find out once you have already started making purchases.
Step 4: Transfer ETH to Your MetaMask
Now it’s time to move your ETH from the exchange where you bought it to your MetaMask wallet.
The process should be very similar regardless of which platform you are transferring your ETH from. The basic concept is that you need to find your ETH receive address (the same one you use when you buy ETH), and then copy it over to the “Send” or “Withdraw” field in your account with your exchange.
For illustration purposes, I will use Coinbase as an example.
Determine Your Gas Fees
First you will need to determine what your gas fees will be. To do this, head over to etherscan.io, complete the CAPTCHA verification if required, and then check what your gas fees will be.
Find and Copy Your MetaMask “Buy” Address
Now open your MetaMask wallet by clicking on the extension icon (this step is obviously not necessary if you are using the MetaMask mobile app). It should look like this:

Click on your account name in the center at the top (highlighted in red). In my case it is called “Account 1”. By clicking on it, your ETH address for receiving transfers will be copied to your clipboard.Paste Your MetaMask Receive Address into Your Exchange’s “Send” field
Now that your Buy address has been copied, all you need to do is paste it into the appropriate field in the “Send” (it may also be called “Withdraw” or something else on the exchange that you are using) field in your exchange account.
Since the actual Send/Withdraw interface will look different depending on the exchange you have your ETH in so you will have to find the right place to do this on your own. However, the process is fairly similar on most exchanges. With Coinbase, for example, you would do this in the following way:
- Click on your “Ethereum” balance.
- Click on the “Send” tab in the window that appears on the right. Here you will be presented with some fields and options.
- Enter the amount of ETH you would like to withdraw from your account. You can also click on “Send all” (on some exchanges this option may be expressed as “Max” or something else).
- Paste the Buy address you copied from the previous step into the “To:” field in the window.
- You will also have the option to include a message and select which balance you would like to use to send the ETH payment. Leave this option set to “Ethereum”. Coinbase provides the option to first do a test transaction. This costs a little more in gas fees but is worth it, especially if you are withdrawing or sending large amounts of ETH and want to avoid potentially losing it forever.
- Click the “Continue” button. A new window showing the amount you will be sending after gas fees have been deducted.
- If you are satisfied with the amount indicated, click on “Send now”.
- If you have 2FA (such as Google Authenticator) enabled, a confirmation window will open. Enter your authentication code.
- Click “Confirm”.
- A final window, showing how much ETH you have sent and some other data, will appear. You can now click on “Done”.

Now all you have to do is wait for the ETH you have just sent from your exchange account to appear in your MetaMask wallet.
Step 5: Find an NFT on OpenSea
- Now click on “Marketplace” and then “All NFTs” in the dropdown menu that appears.

- On the next page that opens, click on an NFT that you would like to buy. Alternatively, you can use a direct link to an NFT that you are interested in, or you can search for NFTs you are interested in using relevant search terms in the search bar at the top of the page.

For the purpose of this tutorial, I will choose the first NFT in the image above as an example.


Step 6: Buy NFTs
- On the page that opens, click on the “Buy now” button if you would like to buy it at the fixed price at which it is listed.

- Assuming you have chosen to buy an NFT, you can now click to agree to the OpenSea terms of service. If you have enough funds in your MetaMask wallet, click on the Checkout button and follow the rest of the steps to confirm your purchase.

If you do not have enough funds to buy the NFT, you will only be allowed to click on the Add Funds button (as shown in the image above). This will then give you the option to either add more ETH from an exchange or buy ETH using a card. - Alternatively, you can click on the “Make offer” button if you want to bid on an NFT at a different price. Once you have clicked on it, enter the amount you would like to offer.
 Then click the Terms of Service checkbox. You can also enter the time for which you would like your offer to be valid in the “Offer Expiration” field (number of days and time when you would like it to expire). Finally you can click on the Make offer button.If the button is not clickable (as in the image above), then simply add more ETH to your MetaMask or look for a cheaper NFT to buy.


 Then click the Terms of Service checkbox. You can also enter the time for which you would like your offer to be valid in the “Offer Expiration” field (number of days and time when you would like it to expire). Finally you can click on the Make offer button.If the button is not clickable (as in the image above), then simply add more ETH to your MetaMask or look for a cheaper NFT to buy.
Step 7: Approve in MetaMask
The final step is to approve your transaction in MetaMask. To do this, simply follow the prompts in your MetaMask window.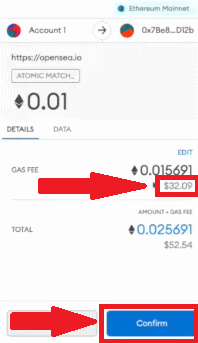
As you can see in the example above, the gas fee is $32.09 for this transaction. If you are satisfied with the total cost of the transaction, you can click on Confirm. Alternatively you can click on Edit to manually select the amount of gas fees you would like to pay.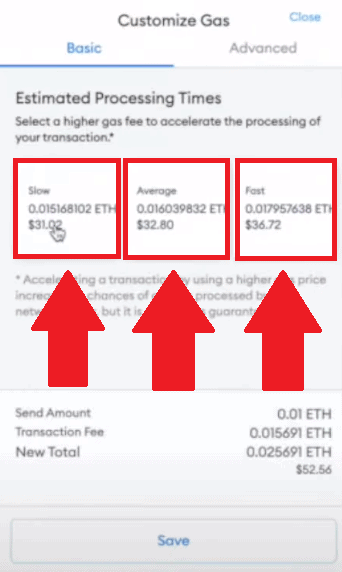
The less you choose to pay in gas fees, the longer your transaction will take to complete. So if you’re not in a hurry, you could save money here by setting your gas fees lower.
If you would like to manually set the amount you pay for your transaction, you can click on the Advanced tab at the top right of the window.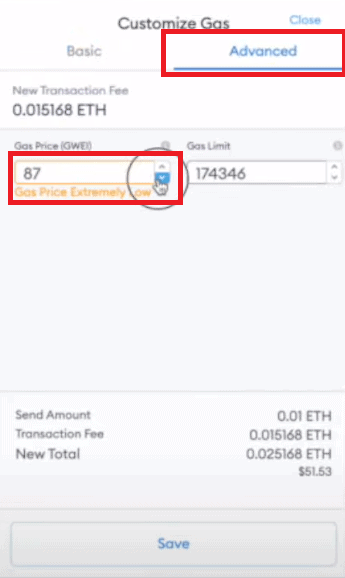
Do bear in mind that if your gas fees are too low, your transaction may take several days to complete, or may not even complete at all! Nevertheless, if you do choose to set your gas fees manually, click the Save button once you are satisfied with the gas fee settings.
To check on the progress of your transaction, you can open your MetaMask wallet by clicking on its icon at the top of your browser, then clicking on the Activity tab. You will see the status of all your transactions in the list beneath it.![]()
Transactions that have not yet completed will be listed in the “Queued” section (as indicated in the image above) and will include the word “Pending”.
Viewing your NFTs in OpenSea
To view the NFTs you have already bought, click on the Profile icon in the top right corner of your OpenSea account interface.![]()
This will open a window displaying all the NFTs in your OpenSea NFT wallet, i.e. all the NFTs you own.
From there you can either sell your NFTs, put them on auction or transfer them to other NFT platforms.
Where Else to Buy NFTs?
There are already many NFT platforms out there, and they are increasing in number every month. As mentioned, some NFT marketplaces only list curated works. Others only list NFT art that belongs to a certain genre or style.
Now that you know how to use MetaMask and purchase NFTs, feel free to read our dedicated article on the Best NFT Marketplaces.
Well, I hope this article helped to get you started on your exciting new journey into the world of NFTs. Below are some frequently asked questions among newcomers to the NFT space.